
- You will need a workingversion of Tomcat. But it needs to be stopped. We’re going to be running it from within Eclipse
- Download and install the Eclipse Web Tools Package. You don’t need the SDK version. The update site for helios is here: http://download.eclipse.org/webtools/repository/helios/
- Use Help->Install New Software to get the JST Server Adapters and the JST Server Adapter Extensions. Without these, Tomcat is not available. Using the site for the IDE version you’re using (Helios, Juno, etc) search for “Server”. That will let you find the adapters.
- Open the Window->Show View->Other… then inside the view three find Sever->Servers view
- Inside the Servers view, create a new Server. You should be able to select the Tomcat version that you want. You will also need to point it at the version of Tomcat you have installed.

Select Server Dialog
- After clicking “Next”, select where your regular Tomcat instance is:

Connect to server
- To adjust the server settings, right-click on the server in the “Servers” tab and select “Open”. You’ll get the following view:

- Before adding any items to the server, you can adjust where it runs by clicking on an option in “Server Locations”. I prefer the “Use Tomcat installation). It allows me to set the Flex project to deploy to an easy to find location.
- You can have the Server create an URL that is distinct from the directory that the code is actually deployed too. In other words, it is possible to have two distinct URLS that will work in one instance – the physical location of the files, and the specified URL. This is done by selecting the “Modules” tab on the bottom of the Overview:
 This can be very useful, as the name of the project (VSSTestbed3) may not be what you want to have all your code files point to: (VisibilityScriptingServer)
 - Create a new project of type Web->Dynamic Web Project. I named mine RemoteObjectTestbed
- Add the project to the server by right-clicking on the server in the server view. That brings up a dialog that allows you to select web projects and move them over to the server.
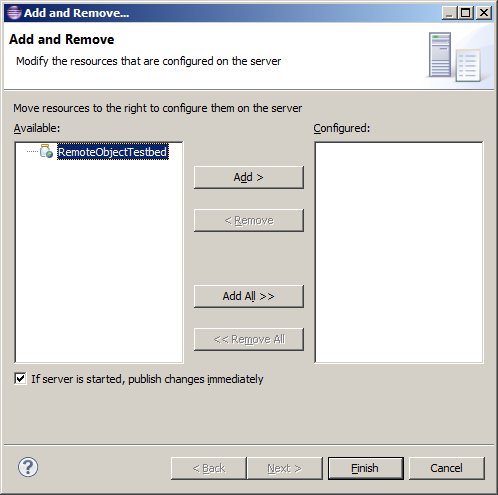
Connect Project to Server
- Since I was debugging a project that I had already started using MavenAssist, I copied over a bunch of stuff. These files get placed in the WebContent folder. This is the folder that you pointed to in step 7. :
- The files that get deployed are under the Program Files folder in your web project.
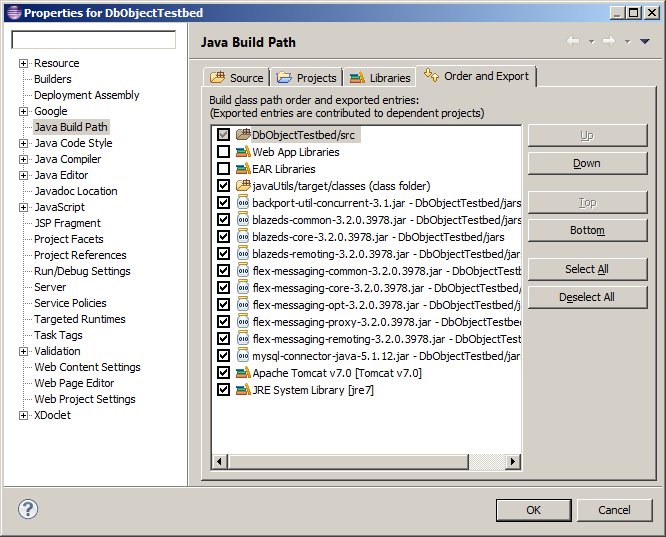
- Add a lib folder and fill it with all the jars you need to run flex (take from a working version). Include these libs as exportable in the Build Path settings in properties. Check the “Problems” view though, to make sure there are no warnings about the libraries not being exported. If there are, right-click and use “Quick Fix” to correct.

Order and Export Dialog
- Add a flex folder and put the flex xml files from a working project
- Under web inf, copy a web.xml file
- Add a lib folder and fill it with all the jars you need to run flex (take from a working version). Include these libs as exportable in the Build Path settings in properties. Check the “Problems” view though, to make sure there are no warnings about the libraries not being exported. If there are, right-click and use “Quick Fix” to correct.
- Now you need to export jars to the ‘lib’ directory. Under ‘Properties’, select ‘Deployment Assembly’. First, add ‘Archives from Workspace’. These will be the jars needed to make items run that are not exported from other projects, such as flex libraries and mysql connectors.
- Next, click ‘Projects’ and add the required projects. This will create jars from those projects and place them in the proper directory. A complete example for a flex project is shown below:

- If you’ve copied everything over correctly, you should be able to start the server by right clicking on the Server in the Servers view and selecting “Start” or “Debug”. If you navigate to http://localhost/XXX/messagebroker/amf you should get a nice blank screen, not a 404 or some other crappy result. If everything works, turn off the server before continuing. A screenshot of a running example is shown below:

Running testbed
- The files that get deployed are under the Program Files folder in your web project.
- Create Flex package(s) under the “Java Resources:src” folder for your code. These packages will need to be the same as what’s in the remoting-config.xml file. These are your remote objects.
- To debug the remote object, place your breakpoints and start the server in debug mode. Starting the server appears to reload the entire project so if you have a Flex project dropping its output in the XXX folder, you’ll have to rebuild.
- At this point you should be able to debug both side of the application. I’ve recently been running Flex in Flashbuilder and Java in Eclipse.


————————————————————————————–
Notes:
If you happen to get an error that looks something like:
SEVERE: Error starting static Resources
java.lang.IllegalArgumentException: Document base C:\workspace\.metadata\.plugins\org.eclipse.wst.server.core\tmp0...
You can get rid of it sometimes by deleting the
"tmp0"
directory. Otherwise, you may have to delete and recreate the server.
- Server Overview Dialog
